我的书签
 添加书签
 移除书签
Burning Discs, Images and Virtual Drive
Burn files to Disc
Introduction
Burn files to Disc tool will let you burn any kind of file to CD/DVD/Blu-Ray media. It supports importing of sessions and creating of boot media.
To start the Burn files to Disc tool, click on “Burn files to Disc” under “Burner” menu in main PowerArchiver window. You will be presented with following options:
Main Options
-
“Drive” - select drive that you want to burn files to. It has to be CD/DVD/Blu-Ray burner. First recordable drive is preselected.
-
“Speed” - select speed that you want to burn files in. This affect only writing of the files (and not reading of them later on the disc). Make sure to check your media supports speed that you have selected. Sometimes your drive might support faster speeds than your media, which will result in bad disc.
-
“Refresh” - refresh your drives list. You might need to do so if you have not inserted blank media before starting Burner tool.
-
“Disc label” - enter disc label for your new disc.
-
“Use last session” - automatically imports last session to the file list. Your drive will only read latest session that you have created - so unless you import last session, you will “lose” any previous data you had on the disc.
-
“Create Multi Session disc” - create multi session disc that can be written to later on. If not checked, PowerArchiver will finalize the session and you will not be able to add any data to disc later on.
-
“Erase disc before writing” - Erases rewritable media.
-
“File system:” - select file system for burned disc (very important).
-
“ISO/Joliet (ANSI)” - ISO 9660 file system which is used for compatibility - use this for burning discs for non-PC use (car, home audio, home video, etc.). It has 2 GB maximum limit per file and uses ANSI code sets for saving filenames.
-
“UDF (Unicode)” - UDF 2.x is latest files system for discs. It has “unlimited” file sizes and uses Unicode for saving file names which makes it best option to use. It has very limited compatibility with anything that is not PC.
File List Options:
- “File List” - as you can see, there are separate buttons for “Add File” and “Add Folder”. By using these buttons, you can select files and folders that will be burned. Once you select files and/or folders, they will be added to the File List and displayed. If you wish to remove an object from the list, simply select it and click on the “Remove” button or use “Remove All” to clear the complete File List.
Options: (for Advanced users only)
Burning Options
-
“Verify files after burning” - After burning process finishes, Burner will verify that all files have burned correctly.
-
“Load disc back on finish if possible” - Burner will try to re-load the disc tray after burning process has been completed.
Boot Options
-
“Create bootable disc” - creates bootable disc that can be booted from.
-
“Boot image type” - select type of the boot image.
-
“Boot image:” - select which boot image you wish to use.
General
-
“Burning support via:” - Select which driver to use for burning files.
-
“AutoDetect” - Automatically detects which driver to use
-
“SPTD” - Uses SPTD driver which is most advanced and requires Virtual Drive to be installed.
-
“SPTI” - Uses Microsoft latest interface for disc drives.
-
“ASPI” - Old interface, only used for compatibility reasons (if all others do not work).
Tips and Tricks
You can create mp3 discs with PowerArchiver burner. Simply add mp3 files that you want to burn and click on Burn button. Your mp3 player will automatically recognize these files. If you categorize mp3 files in folders, you will be able to find them easier on your mp3 player.
Burn image (.ISO) to Disc
Introduction
Burn Image (.ISO) to Disc tool will let you create disc from ISO files. To start the Burn image (.ISO) to Disc tool, click on “Burn image (.ISO) to Disc” under “Burner” menu in main PowerArchiver window. You will be presented with following options:
Burning Options
-
“Image Filename:” - enter filename of the image - ISO file that you wish to create disc from. You can click on ”…” and you will be able to browse your computer to find ISO image.
-
“Drive:” - select drive that you want to burn files to. It has to be CD/DVD/Blu-Ray burner. First recordable drive is preselected.
-
“Speed:” - select speed that you want to burn files in. This affect only writing of the files (and not reading of them later on the disc). Make sure to check your media supports speed that you have selected. Sometimes your drive might support faster speeds than your media, which will result in bad disc.
-
“Refresh” - refresh your drives list. You might need to do so if you have not inserted blank media before starting Burner tool.
-
“Full disc erase” - Erases rewritable media.
-
“Load disc back on finish if possible” - Burner will try to re-load the disc tray after burning process has been completed.
Tips and Tricks
If you need to use ISO files on your local computer, you can simply mount them via Virtual Drive and you will not have to burn the disc. That will save you some time and there will be less waste to recycle.
Copy Disc to Disc
Introduction
Copy Disc to Disc tool that lets you copy one disc to another, without having to save data to the drive.
You can start Copy Disc to Disc by going to Burner tab and clicking on Copy Disc to Disc.
Options
-
“Drives:” - select drive where you have inserted the disc that you want to copy.
-
“Drives:” - select drive where you have inserted the disc that you want to burn copy to. Please note that if you have single disc drive, then both Drives selections will be the same.
-
“Speed” - speed at which you want to burn the media (make sure that media supports that speed).
-
“Full disc erase” - When checked complete disc will be erased.
-
“Load disc back on finish if possible” - Burner will try to re-load the disc tray after burning process has been completed.
Copy disc to Image (.ISO)
Introduction
Copy disc to Image (.ISO) tool will let you create ISO files from disc. To start the Copy disc to Image (.ISO) tool, click on “Copy disc to Image (.ISO)” under “Burner” menu in main PowerArchiver window.
Burning Options
-
“Drive:” - select drive that you to create ISO image from.
-
“Select Track” - select track that you want to save as ISO image. If you select All tracks, PowerArchiver will create multiple ISO images depending on how many tracks there are. Usually only last session/track is selected.
-
“Refresh” - refresh your drives list. You might need to do so if you have not inserted media before starting tool.
-
“Destination Folder:” - enter the folder where you want your ISO files stored. You can click on ”…” and you will be able to browse your computer to find folder.
-
“Destination Filename:” - enter filename of the image - ISO file that you wish to create disc from.
Tips and Tricks
If you need to use ISO files on your local computer, you can simply mount them via Virtual Drive and you will not have to burn the disc. That will save you some time and there will be less waste to recycle.
Create New Disc Image (ISO)
Introduction
New Disc Image tool will let you create ISO images - both ISO9660 and UDF formats.
You can start New Disc Image Wizard by going to Burner tab and clicking on New Disc Image.
Options
-
“File system:” - select file system for ISO image (very important).
-
“ISO/Joliet (ANSI)” - ISO 9660 file system which is used for compatibility - use this for ISO images for non-PC use (car, home audio, home video, etc.). It has 2 GB maximum limit per file and uses ANSI code sets for saving filenames.
-
“UDF (Unicode)” - UDF 2.x is latest files system for discs. It has “unlimited” file sizes and uses Unicode for saving file names which makes it best option to use. It has very limited compatibility with anything that is not PC.
File List Options
- “File List” - as you can see, there are separate buttons for “Add File” and “Add Folder”. By using these buttons, you can select files and folders that will be burned. Once you select files and/or folders, they will be added to the File List and displayed. If you wish to remove an object from the list, simply select it and click on the “Remove” button or use “Remove All” to clear the complete File List.
Options: (for Advanced users only)
Boot Options
-
“Create bootable disc” - creates bootable disc that can be booted from.
-
“Boot image type” - select type of the boot image.
-
“Boot image:” - select which boot image you wish to use.
Virtual Drive
Introduction
Virtual Drive is an tool that will let you create virtual dvd's from ISO images that you have stored on your computer. You will not need to burn the ISO image first. It is most useful to backup your important DVD's to ISO images and then use them later on without having to burn the disc.
Installing Virtual Drive
You can start Virtual Drive Wizard by going to Burner tab and clicking on Virtual Drive. If you do not already have Virtual Drive installed, PowerArchiver will automatically offer to download and install latest PAVD drivers for you. 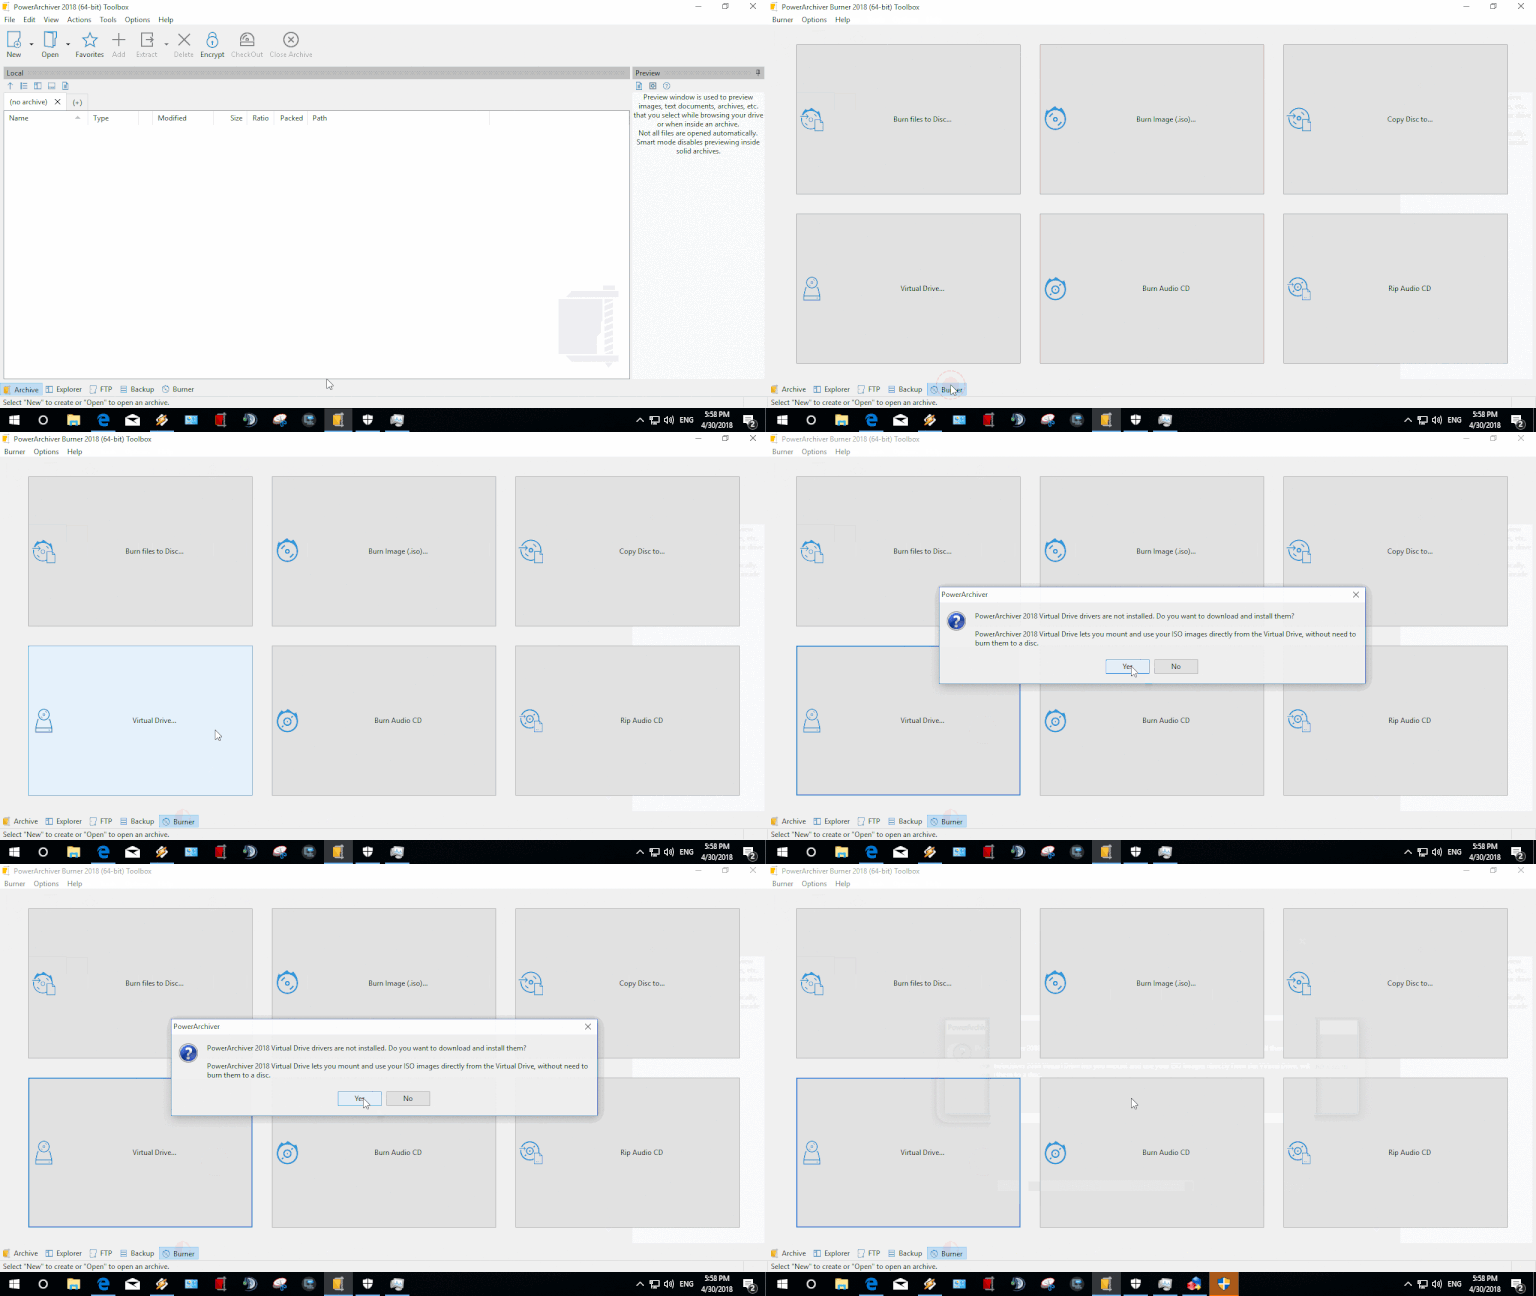
Adding new Virtual Drive
-
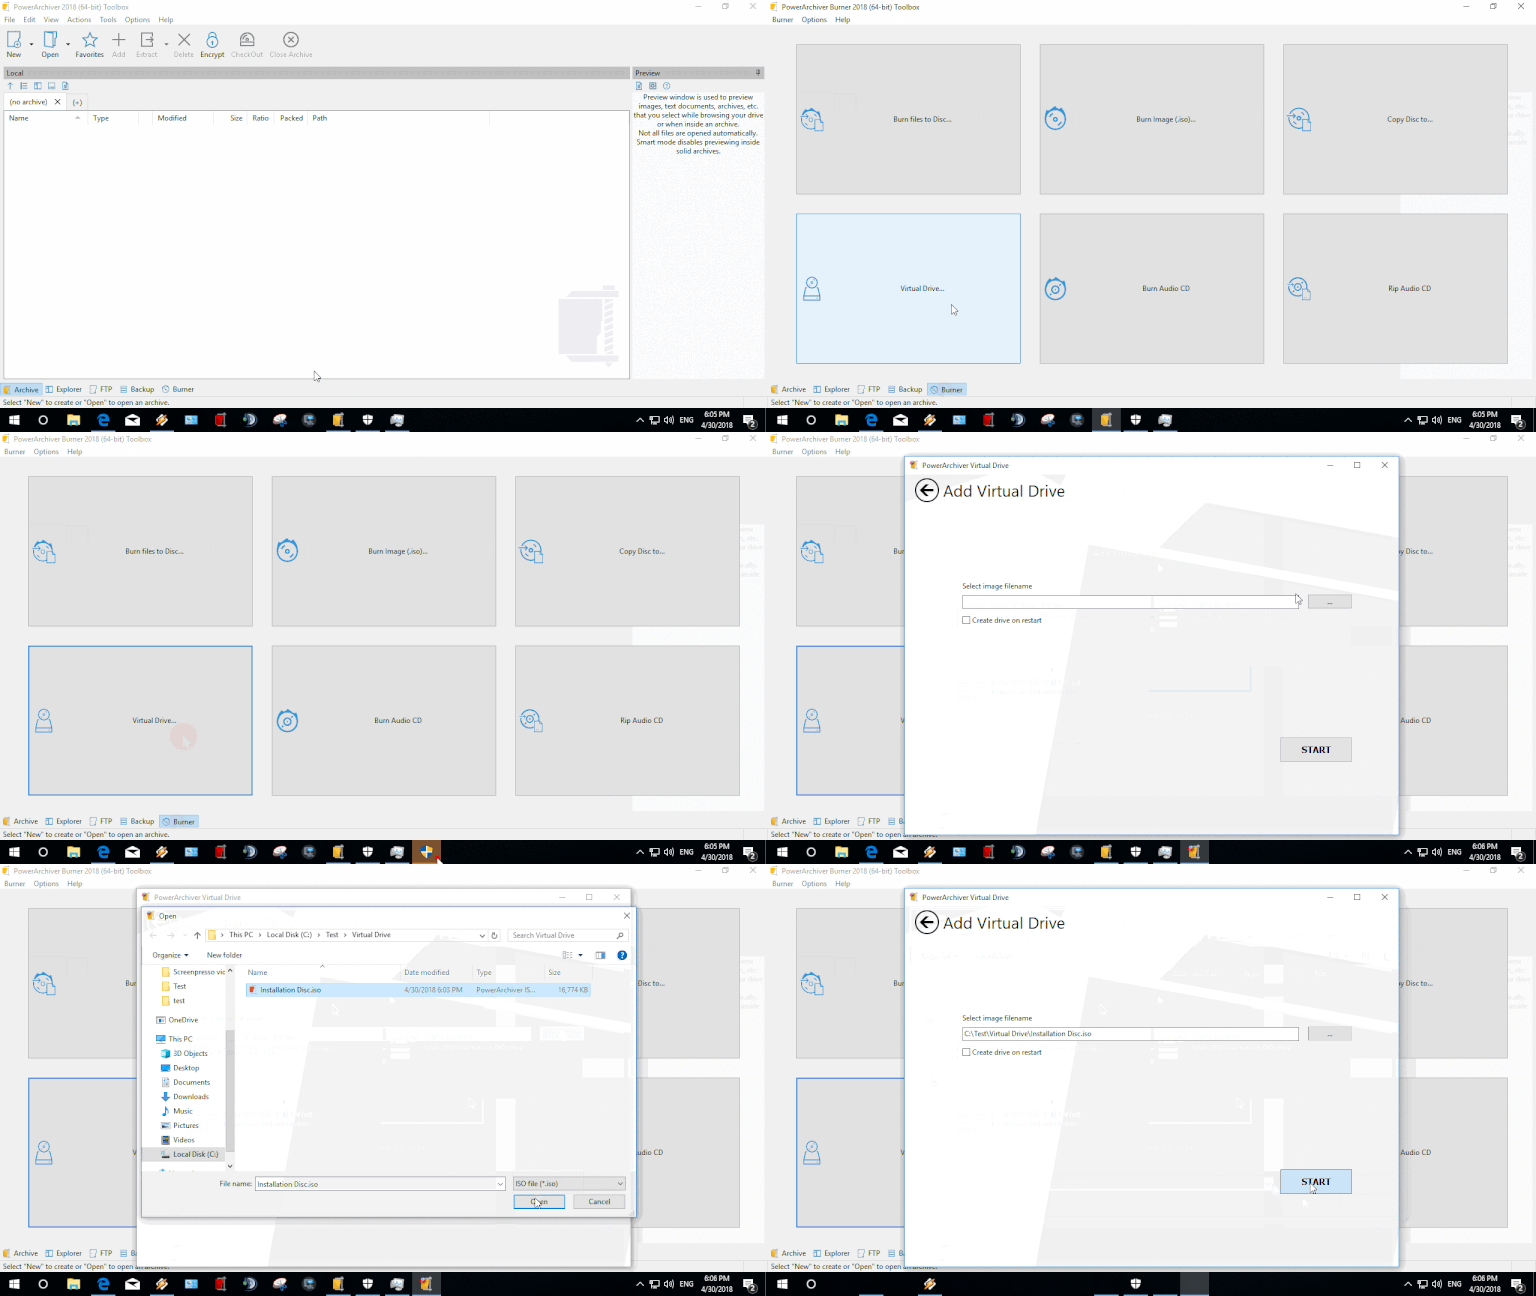
Click on Virtual Drive under Burner tab in main PowerArchiver Window.
-
Click on “Create a new Virtual DVD device” and click on next.
-
Select ISO image that you want to mount as new DVD and click on next.
-
Review details and click on next.
-
Your Virtual DVD is mounted and you will be able to find it under Removable drives in My Computer.
Removing Virtual Drive device
-
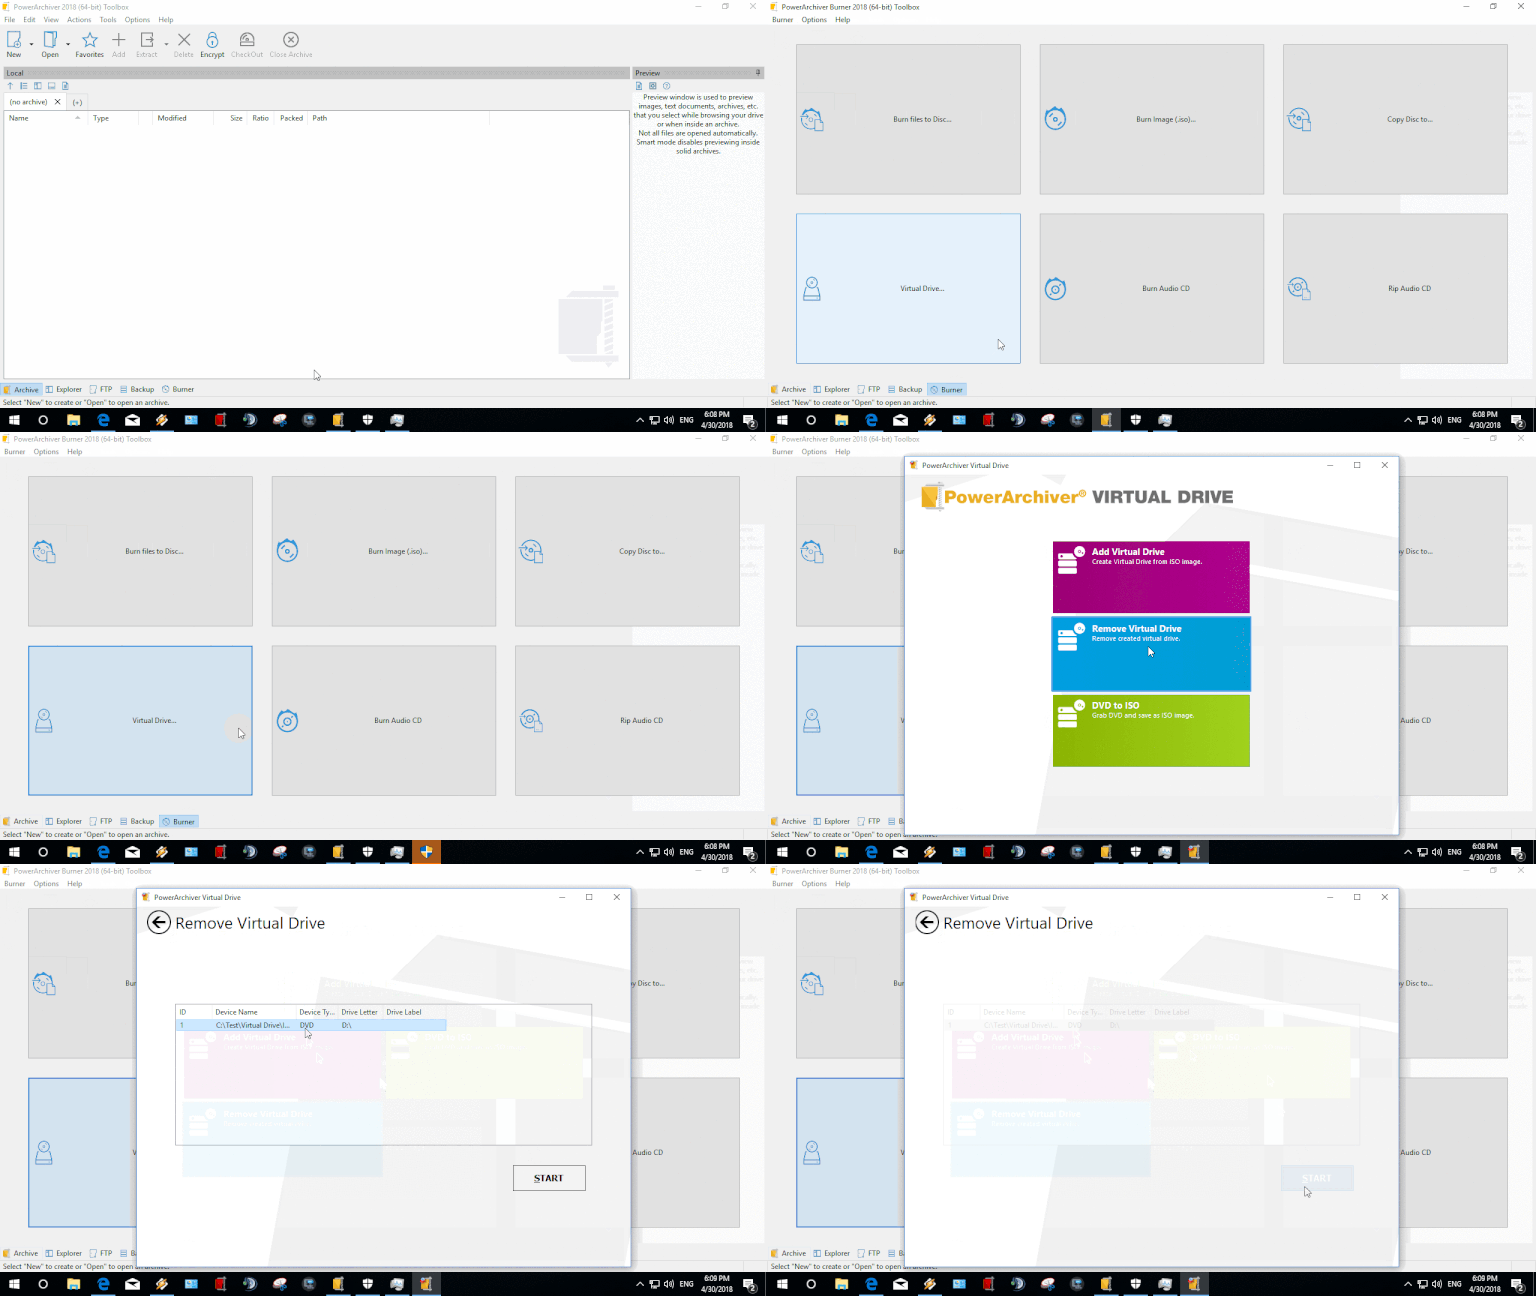
Click on Virtual Drive under Burner tab in main PowerArchiver Window.
-
Click on “Unmount/Remove Device” and click on next.
-
Select device to unmount and click on next.
-
Review details and click on next.
Copy Disc to Image (.ISO)
Copy disc to Image (.ISO) tool will let you create ISO files from disc. To start the Copy disc to Image (.ISO) tool, click on “Copy disc to Image (.ISO)” under “Burner” menu in main PowerArchiver window.
-
“Drive:” - select drive that you to create ISO image from.
-
“Select Track” - select track that you want to save as ISO image. If you select All tracks, PowerArchiver will create multiple ISO images depending on how many tracks there are. Usually only last session/track is selected.
-
“Refresh” - refresh your drives list. You might need to do so if you have not inserted media before starting tool.
-
“Destination Folder:” - enter the folder where you want your ISO files stored. You can click on ”…” and you will be able to browse your computer to find folder.
-
“Destination Filename:” - enter filename of the image - ISO file that you wish to create disc from.
Please note: This feature is disabled for non registered users of PowerArchiver Toolbox. To enable it, you need to purchase PowerArchiver Toolbox.
Tips and Tricks
It is recommended that you backup your purchased software DVD's to ISO files. Not only you will be able to use them easier with Virtual Drive, but today's DVD's have short life and it is quite possible that when you need that DVD again, it will not work due to scratches or weather influence. First thing to do when purchasing new computer or new software, is to make an copy of them via Copy DVD to Image (ISO) tool. PowerArchiver's Virtual Drive will not be able to mount copy protected DVD's - such as games. Software such as Microsoft Windows, Microsoft Office and others, should work great.
Burn Audio CD
Introduction
Burn Audio burns your audio files to CD/DVD disc, to create AUDIO CD. It can use mp3, wma, ogg and wav files to create Audio CD.
Options
-
“Drive:” - select drive where you have inserted the disc that you want to erase.
-
“Speed” - speed at which you want to erase the media (make sure that media supports that speed).
-
“Add Files” - click to select and add files to the Audio Burner tracklist.
-
“CD-Test” - click to edit CD-Text information for the files in tracklist.
-
“Remove” - click to remove selected files from burner tracklist
-
“Remove All” - click to remove all files from burner tracklist.
-
“Move Up” - click to move file selection one space up
-
“Move Down” - click to move file selection one space down
Compiled from the official PowerArchiver Wiki (https://wiki.powerarchiver.com/)