
 我的书签
 添加书签
 移除书签
Visual Studio Code detailed walkthrough
Last updated Jul 27, 2026 This walkthrough connects Visual Studio Code directly to the Cloudflare API using the Cloudflare MCP server ↗︎. By the end, you can create a DNS record by typing a sentence, without leaving the editor.
The Cloudflare MCP server at mcp.cloudflare.com exposes the Cloudflare API to any MCP-capable agent. The Visual Studio Code Copilot agent connects to it, and you run API calls from natural language.
For the condensed version, refer to the Visual Studio Code quick start.
Before you start
- Visual Studio Code, fully up to date. A version mismatch between the editor and the Copilot extension is the most common source of agent-mode errors.
- GitHub Copilot. Any GitHub account works, and the free tier is enough.
- A Cloudflare account you are comfortable pointing an agent at. Use a demo account. The reason becomes clear at the authorization step.
Connect Visual Studio Code to the Cloudflare API
- Confirm your Visual Studio Code version
Open Visual Studio Code and select Help > About. Confirm you are on a current build. If an Update button appears in the title bar, select it and let Visual Studio Code restart before continuing. 2. Sign in to Copilot
Select the Copilot icon in the Status Bar, select Use AI Features, then sign in with a GitHub account. Visual Studio Code opens your browser to authorize.
3. Authenticate to Copilot
Follow the browser pages to authenticate to GitHub.
4. Create a folder and open it
Create an empty folder for this project, then open it in Visual Studio Code with File > Open Folder. For example, ~/cloudflare-api-mcp/.
5. Create the configuration file
Inside the folder, create one file: .vscode/mcp.json. Typing .vscode/mcp.json in the Explorer creates the folder and file together. Paste the following into the file, then save:
json
   {
     "servers": {
       "cloudflare-api": {
         "type": "http",
         "url": "https://mcp.cloudflare.com/mcp"
       }
     }
   }
Note
The root key in Visual Studio Code is servers. Configurations written for Cursor or Claude Desktop use mcpServers, which does nothing here.
6. Start the server
After you save the file, a Start link appears on the cloudflare-api server definition. It looks like a comment, but it is a button (a CodeLens ↗︎). Select it, then allow the authentication prompt. Your browser opens the Cloudflare authorization page.
7. Choose an access template
The authorization page is where you decide what the agent can access. This example selects Full access to modify DNS records. You can also start with Read only or build a Custom permission set. Scope the grant to a single account, then review what you are granting. Before you authorize, know two things. Full access lets the agent create and delete real resources, which is why this belongs on a demo account. You can revoke the grant at any time from the dashboard under My Profile > Access Management > Connected Applications, which is also the page to visit if a re-authorization behaves unexpectedly.
8. Verify permissions and authorize
Review the list of permissions, then select Authorize to let the Cloudflare API interact with your account. Note
You may see 401 errors in the Visual Studio Code logs. This is expected until you select Allow in this Session in the authorization prompt.
9. Open Copilot Chat
If Copilot is minimized, open it with View > Chat.
10. Confirm the server is running
The server now shows as running. The CodeLens reads **Running | 3 tools**. Three tools is correct, not a broken install: the server uses a search-and-execute pattern instead of registering thousands of individual endpoints.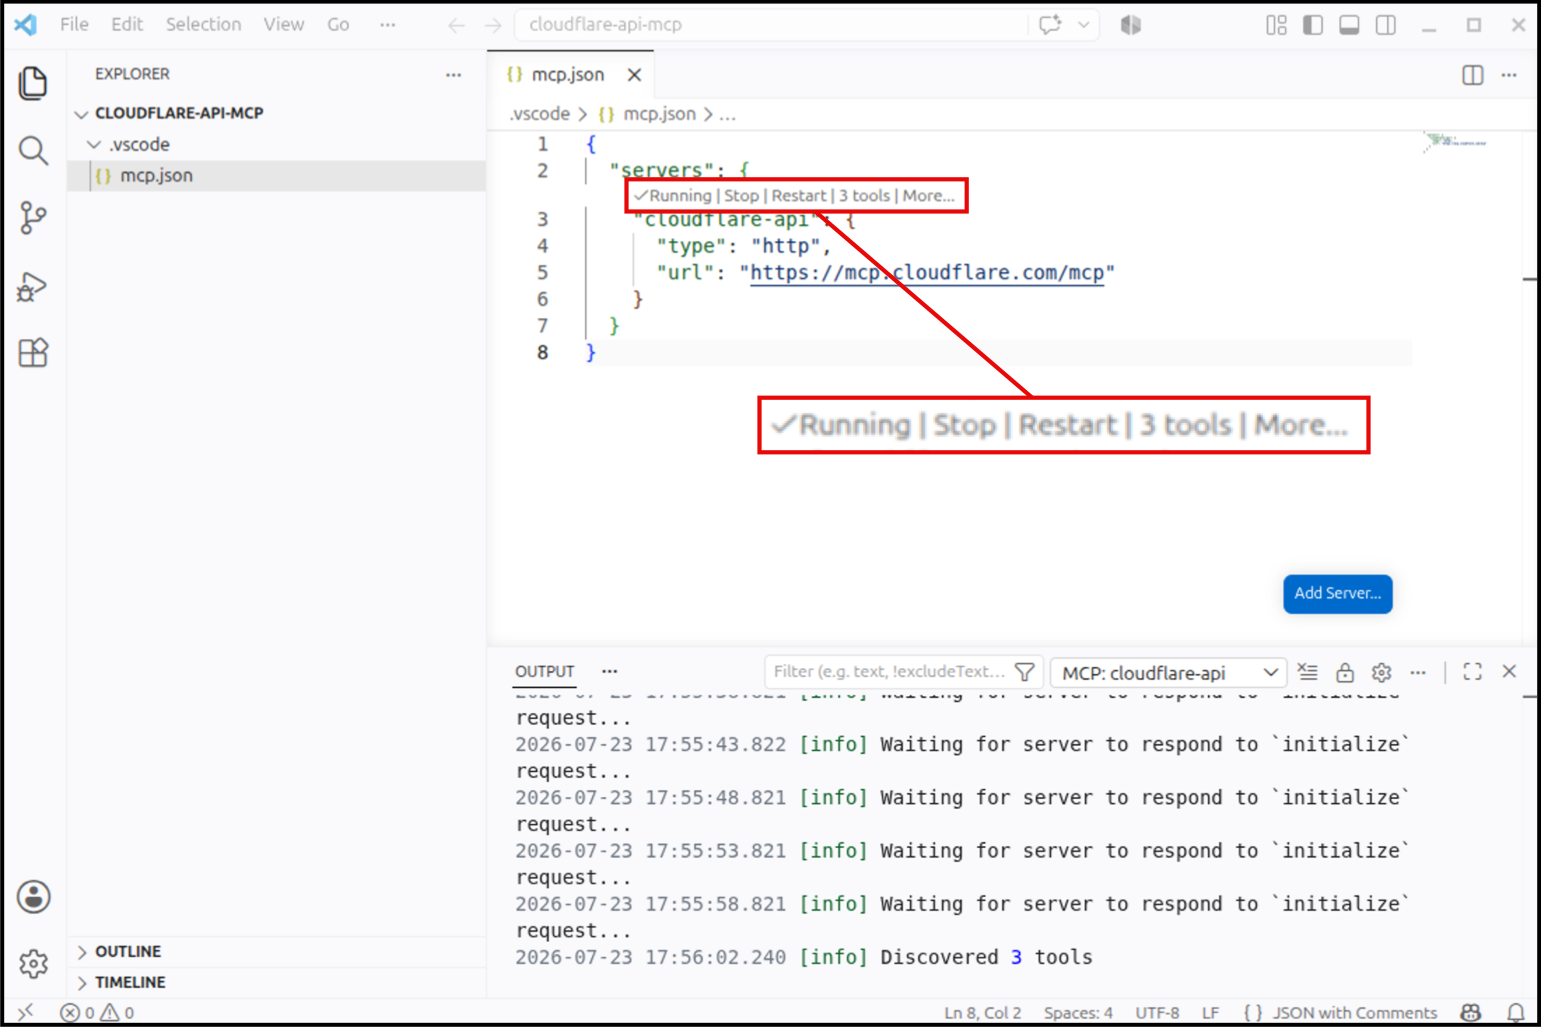
-
List your zones
In Copilot Chat, set the mode to Agent, then ask it to list your zones. The agent requests your approval before running the call and returns a live list of every domain in the account.
txt
List zones in my account
```txt Ran Cloudflare API Code Executor
- Zones returned: 1
- Zone: cloudflaredemo.net — id:
— status: active ```
-
Create a DNS record
Ask the agent to create a DNS AAAA record and turn on the Cloudflare proxy. This example points
test.cloudflaredemo.netat100::, a reserved placeholder address from the IPv6 discard prefix0100::/64(RFC 6666 ↗︎). Because the record is proxied, Cloudflare intercepts requests before they reach this address. Approve the tool call (Always Allow), and the agent reports the record created.txt Create a AAAA record for test.cloudflaredemo.net pointing to 100:: and enable the proxy.```txt Ran Cloudflare API Code Executor
- Record created: test.cloudflaredemo.net
- Type: AAAA
- Value: 100::
- Proxied: true
- Record ID:
```
Do not rely on the agent's report alone. Open the dashboard and check the zone.
13. Verify DNS propagationAsk the Cloudflare MCP server to verify that the record propagated.
txt
Verify DNS propagation for test.cloudflaredemo.net
```txt Ran: dig @1.1.1.1 test.cloudflaredemo.net AAAA +short
- Result: DNS resolves to Cloudflare IPv6 addresses (proxy active).
- Resolvers returning AAAA: 1.1.1.1, 8.8.8.8, 9.9.9.9
- 2606:4700::6812:2f3
- 2606:4700::6812:3f3 ```
Note
Because you turned on the proxy, the response returns Cloudflare-owned IP addresses rather than the origin
100::address. 14. Delete the DNS recordYou can delete the record as easily as you created it.
txt
Delete test.cloudflaredemo.net
```txt Ran Cloudflare API Code Executor
Deleted the DNS record for test.cloudflaredemo.net. ```
You now have an AI agent with read and write access to Cloudflare services in the account, driven entirely from Visual Studio Code.
Related resources
- Visual Studio Code quick start — condensed setup, tips, FAQ, and troubleshooting.
- Cloudflare MCP server ↗︎ — domain-specific MCP servers.
- Cloudflare API — the full REST API reference.
Was this helpful?
YesNo
{"@context":"https://schema.org","@type":"TechArticle","@id":"https://developers.cloudflare.com/agent-setup/visual-studio-code/detailed-walkthrough/#page","headline":"Visual Studio Code detailed walkthrough","description":"A screenshot-by-screenshot guide to connecting Visual Studio Code to the Cloudflare API through the Cloudflare MCP server, then creating, verifying, and deleting a DNS record with natural language.","url":"https://developers.cloudflare.com/agent-setup/visual-studio-code/detailed-walkthrough/","inLanguage":"en","image":"https://developers.cloudflare.com/agent-setup/visual-studio-code/detailed-walkthrough/og.png?v=9bc737509ef11abe","dateModified":"2026-07-27","publisher":{"@type":"Organization","name":"Cloudflare","description":"One platform for your apps, agents, and workforce. Build, secure, and scale without managing infrastructure","url":"https://www.cloudflare.com/","sameAs":["https://github.com/cloudflare","https://www.linkedin.com/company/cloudflare","https://x.com/cloudflare"],"logo":{"@type":"ImageObject","url":"https://developers.cloudflare.com/logo.svg"},"address":{"@type":"PostalAddress","streetAddress":"101 Townsend St","addressLocality":"San Francisco","addressRegion":"CA","postalCode":"94107","addressCountry":"US"},"contactPoint":[{"@type":"ContactPoint","contactType":"Customer Support","url":"https://support.cloudflare.com/","availableLanguage":["English"]},{"@type":"ContactPoint","contactType":"Sales","url":"https://www.cloudflare.com/contact/","availableLanguage":["English"]}]},"isPartOf":{"@type":"WebSite","@id":"https://developers.cloudflare.com/#website","name":"Cloudflare Docs","url":"https://developers.cloudflare.com/"}}
description: Connect AI agents and LLMs to Cloudflare docs title: Docs for agents image: https://developers.cloudflare.com/docs-for-agents/og.png?v=dd887e171c76e4ee
Documentation Index
Fetch the complete documentation index at: https://developers.cloudflare.com/docs-for-agents/llms.txt
Use this file to discover all available pages before exploring further.

