
 我的书签
 添加书签
 移除书签
User Scene Textures for Post Process Materials(1/5)
User Scene Textures are user-defined transient render targets that can be written and read in post process materials, making it possible to support multi-pass post process effects.
This guide demonstrates how you can use User Scene Textures to create a variable blur effect on screen whereby there is no blur in the middle of the screen and varying amounts of blur towards the outer edge of the screen. The blur effect is achieved by interpolating between the original scene color and two downsampled and blurred User Scene Textures, each generated with a two-pass separable gaussian filter. This method can provide better efficiency than a single-pass blur.

In this guide, you’ll set up the following:
- A material to downsample and blur user scene textures.
- Materials to blur along the horizontal and vertical parts of the screen.
- Multiple material instances to create the read and write elements of User Scene Textures.
- Explore some debugging options for this type of effect with console commands and material logic.
Preliminary Material Creation
To begin with, you’ll start by creating three separate materials. Each of these materials will be used to build out the different elements needed to create a variable blur post process effect. This starts with one material to downsample, and two materials to each blur the horizontal and vertical components of the effect. These materials will be used later in this guide to create material instances to read and write to User Scene Textures that will create this multi-pass effect.
Follow these steps to get started creating this effect:
- In the Content Browser, click the Add (+) button and create three Materials.
- Name each material as follows: Downsample
- BlurHoriz
- BlurVert
You should have three materials that look like this:
Setting Up the Downsample Material
Follow these steps to create the Downsample material:
- Open the Downsample material.
- In the Details panel, set the following: Material Domain: Post Process
- Blendable Location: Scene Color Before Bloom
-
User Scene Texture: Output This is used to write to a user scene texture called “Output”.
User Texture Divisor: 2, 2 ( for both values)
-
This tells the material to downsample by a factor of two in both the X and Y dimensions.
Resolution Relative To Input: Input
-
This is used in steps of setting up these materials. However, if not set, the User Texture Divisor scales relative to the absolute screen resolution.
In the Material Graph, right-click and add a User Scene Texture node.
With the User Scene Texture node selected, use the **Details** panel to set the following parameters:
- User Scene Texture: Input
- Filtered: Checked This should be checked because it is performing a bilinear downsample, and this can help avoid artifacts.
Connect the Color output of the User Scene Texture node to the Emissive Color input on the main material node. Click Save.
At this point, the Preview window displays an error message once the User Scene Texture node is created. It indicates that there’s a missing input. This is a debug display that is useful for creating post process materials that have User Scene Textures because it shows the different passes that are running and what their inputs and outputs are.
Setting Up the BlurHoriz Material
Follow these steps to create a material to blur the horizontal component:
- Open the BlurHoriz material.
- In the Details panel, set the following: Material Domain: Post Process
- Blendable Location: Scene Color Before Bloom
-
User Scene Texture: Output This is used to write to a user scene texture called “Output”.
Resolution Relative To Input: Input
-
This is used in steps of setting up these materials. However, if not set, the User Texture Divisor scales relative to the absolute screen resolution.
Disable Pre Exposure Scale: Checked
-
This material doesn’t set the User Texture Divisor because the blur is being done at the same resolution. Effectively, 0 is the same as 1 in this case when left unset.
In the Material Graph, right-click and add a User Scene Texture node.
With the User Scene Texture node selected, use the **Details** panel to set the following parameters:
- User Scene Texture: Input
- Filtered: Checked
- Clamped: Checked
Pull off the Color pin of the User Scene Texture node and add a Custom node. This will be used to write some custom HLSL code for this material.
With the Custom node selected, use the **Details** panel to set the following:
- Input Name: Tex This input is used to fetch the ID to pass to the SceneTextureFetch function in the Custom HLSL node, and works with SceneTexture or UserSceneTexture nodes attached to the input pin.
In the Code field, copy in the following HLSL code:
// Gaussian blur with linear sampling
float offset[3] = { 0.0, 1.3846153846, 3.2307692308 };
float weight[3] = { 0.2270270270, 0.3162162162, 0.0702702703 };
float3 Color = SceneTextureFetch(Tex.ID, float2(0,0)) * weight[0];
for (int i=1; i// Gaussian blur with linear sampling
float offset[3] = { 0.0, 1.3846153846, 3.2307692308 };
float weight[3] = { 0.2270270270, 0.3162162162, 0.0702702703 };
float3 Color = SceneTextureFetch(Tex.ID, float2(0,0)) * weight[0];
for (int i=1; i<3; i++)
{
Color += SceneTextureFetch(Tex.ID, + float2(offset[i], 0.0)) * weight[i];
Color += SceneTextureFetch(Tex.ID, - float2(offset[i], 0.0)) * weight[i];
}
return Color;
Connect the **Custom** output to the main material’s **Emissive Color** input.
Click **Save**.
This post process effect example uses custom HLSL, so it’s important to note that **Disable Pre Exposure Scale** needs to be set because this setting disables some logic that affects scaling of some inputs and outputs of post process materials. You otherwise have to take this into consideration when writing custom HLSL (regular node logic generates code to scale and unscale automatically where needed). Besides avoiding complexity in custom HLSL, there is also a minor performance benefit. It’s generally recommended to disable pre-exposure scale when working with User Scene Textures and custom HLSL.
You can preview the results of the HLSL at this point in the Preview window of the material by changing the “User Scene Texture” field in the User Scene Texture node from “Input” to “SceneColor”. This is a special input that uses the default scene color for this state where it is in the pipeline.
In the **User Scene Texture** node Details panel, set **UserSceneTexture** to `SceneColor`, and **Save** the material.
Once it compiles, your Preview window shows the result of this custom HLSL code. The edges of the sphere should be blurred around the outer edges and the center part of the window is less blurry, like this example (change it back to Input when done):

*With and without these changes to test the material in the Preview window.*
### Setting Up the BlurVert Material
Follow these steps to create a material to blur the vertical component:
1. Open the BlurVert material.
2. In the Details panel, set the following:  Material Domain: Post Process
3. Blendable Location: Scene Color Before Bloom
4. User Scene Texture: Output This is used to write to a user scene texture called “Output”.
**Resolution Relative To Input:** Input
1. This is used in steps of setting up these materials. However, if not set, the User Texture Divisor scales relative to the absolute screen resolution.
**Disable Pre Exposure Scale:** Checked
1. This material doesn’t set the User Texture Divisor because the blur is being done at the same resolution. Effectively, 0 is the same as 1 in this case when left unset.
In the Material Graph, right-click and add a **User Scene Texture** node.
With the User Scene Texture node selected, use the **Details** panel to set the following parameters:
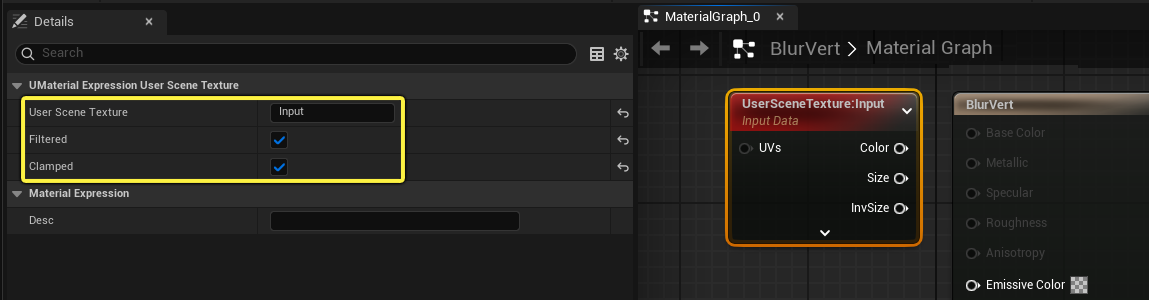
1. User Scene Texture: Input
2. Filtered: Checked
3. Clamped: Checked
Pull off the **Color** pin of the User Scene Texture node and add a **Custom** node. This will be used to write some custom HLSL code for this material.
With the Custom node selected, use the **Details** panel to set the following:

1. Input Name: Tex This input is used to fetch the ID to pass to the SceneTextureFetch function in the Custom HLSL node, and works with SceneTexture or UserSceneTexture nodes attached to the input pin.
In the Code field, copy in the following HLSL code:
 // Gaussian blur with linear sampling
 float offset[3] = { 0.0, 1.3846153846, 3.2307692308 };
 float weight[3] = { 0.2270270270, 0.3162162162, 0.0702702703 };

 float3 Color = SceneTextureFetch(Tex.ID, float2(0,0)) * weight[0];

 for (int i=1; i// Gaussian blur with linear sampling
 float offset[3] = { 0.0, 1.3846153846, 3.2307692308 };
 float weight[3] = { 0.2270270270, 0.3162162162, 0.0702702703 };

 float3 Color = SceneTextureFetch(Tex.ID, float2(0,0)) * weight[0];

 for (int i=1; i<3; i++)
 {
     Color += SceneTextureFetch(Tex.ID, + float2(0.0, offset[i])) * weight[i];
 Color += SceneTextureFetch(Tex.ID, - float2(0.0, offset[i])) * weight[i];
 }
 return Color;
Connect the Custom output to the main material’s Emissive Color input. Click Save.
This material is set up just like the BlurHoriz material in the previous section. The only difference between these two materials is the HLSL code to change the order in which the coordinates are set up for the positive and negative SceneTextureFetch offsets. These HLSL line edits switch the UV offsets from horizontal to vertical when sampling the input texture:
Color += SceneTextureFetch(Tex.ID, + float2(0.0, offset[i])) * weight[i];
Color += SceneTextureFetch(Tex.ID, - float2(0.0, offset[i])) * weight[i];
Copy full snippet
Color += SceneTextureFetch(Tex.ID, + float2(0.0, offset[i])) * weight[i]; Color += SceneTextureFetch(Tex.ID, - float2(0.0, offset[i])) * weight[i];
Setting Up the User Scene Texture Material Instances
With the foundational materials setup, you’ll use these to create several material instances from them to read and write to User Scene Textures to create the horizontal and vertical parts of the screen that are blurred, and how much these passes contribute to the blurring applied through a post process volume for the final effect.
Creating the Horizontal Blur Material Instances
In this step, you’ll use the BlurHoriz material to create a set of material instances to set up some basic information to read and write to User Scene Textures for the horizontal blurring components of this variable blur effect.
HalfA Blur Horizontal Material Instance
This first material instance is created from the Downsample material. This material instance will take an input called Scene Color and writes an output called HalfA.
- In the Content Browser, right-click on the Downsample material and click Create Material Instance. Name it “HalfA”.
- Open the material instance HalfA.
- In the Material Instance Editor in the Details panel, set the following under the Post Process Overrides category: Input: SceneColor
- User Scene Texture Output: HalfA
Save the material instance.
HalfB Blur Horizontal Material Instance
This second material instance is created from the BlurHoriz material. This material instance will use HalfA as its input to write an output called HalfB.
- In the Content Browser, right-click on the BlurHoriz material and click Create Material Instance. Name it “HalfB”.
- Open the material instance HalfB.
- In the Material Instance Editor in the Details panel, set the following under the Post Process Overrides category: Input: HalfA
- User Scene Texture Output: HalfB
Save the material instance.
At this point, you now have two material instances (HalfA and HalfB) set up, it’s useful to turn on the user scene texture debug display in the Preview window with the console command r.PostProcessing.UserSceneTextureDebug 1. This display shows how the User Scene Textures are being read from and written to for this variable blur post process material you are setting up.
When this display is enabled, the Preview window outlines the different passes that are running for this material. In the HalfB material instance, this shows that the HalfA material instance generates an output called HalfA and HalfB reads and generates output for HalfA.
Creating the Vertical Blur Material Instances
In this set of steps, you’ll use the BlurVert material to create a set of material instances to set up some basic information to read and write to User Scene Textures for the vertical blurring components of this variable blur effect.
HalfC Blur Vertical Material Instance
This first vertical material instance is created from the BlurVert material. It takes an input called HalfB and writes an output called HalfC.
- In the Content Browser, right-click on the BlurVert material and click Create Material Instance. Name it “HalfC”.
- Open the material instance HalfC.
- In the Material Instance Editor in the Details panel, set the following under the Post Process Overrides category: Input: HalfB
- User Scene Texture Output: HalfC
Save the material instance.
This completes the set of half-res materials for HalfA, HalfB, and HalfC.
QuarterA Blur Vertical Material Instance
This second vertical material instance is created from the Downsample material. It writes outputs for a quarter resolution chain that takes input from HalfC and outputs to QuarterA.
- In the Content Browser, right-click on the Downsample material and click Create Material Instance. Name it “QuarterA”.
- Open the material instance QuarterA.
- In the Material Instance Editor in the Details panel, set the following under the Post Process Overrides category: Input: HalfC
- User Scene Texture Output: QuarterA
Save the material instance.
QuarterB Blur Vertical Material Instance
This third vertical material instance is created from the BlurHoriz material. It takes an input called QuarterA and writes an output called QuarterB.
- In the Content Browser, right-click on the BlurHoriz material and click Create Material Instance. Name it “QuarterB”.
- Open the material instance QuarterB.
- In the Material Instance Editor in the Details panel, set the following under the Post Process Overrides category: Input: QuarterA
- User Scene Texture Output: QuarterB
Save the material instance.
QuarterC Blur Vertical Material Instance
This fourth, and final, material instance is created from the BlurVert material. It takes an input called QuarterB and writes an output called QuarterC.
- In the Content Browser, right-click on the BlurVert material and click Create Material Instance. Name it “QuarterC”.
- Open the material instance QuarterC.
- In the Material Instance Editor in the Details panel, set the following under the Post Process Overrides category: Input: QuarterB
- User Scene Texture Output: QuarterC
Save the material instance.
This completes the set of quarter-res material instances for QuarterA, QuarterB, and QuarterC.
Material Instance Half-Res and Quarter-Res Results
Once each of these material instances are set up to read and write User Scene Textures, each should show their result in their Preview window. This should look similar to the examples below, where blur is applied in varying amounts based on the user scene textures the material instance is reading and writing to up to that point in the chain.
You can see how all of these material instances work with one another when the user scene texture debug display is enabled. For example, in the QuarterC preview window below, you will see a debug display showing how all the inputs and outputs are chained together to create the layers of this variable blur effect.

